

As I'm currently studying DC certification track, I decided to setup my first vQFX lab. My current multi-vendors virtual LAB runs on ESXi, so I wished to keep my VMware hypervisor also for vQFX instances. I'm a lucky man, vmdk images for vQFX are now available.
Here is a short post to explain how to install and run vQFX 10k on ESXi 5.5.
First you need to download vQFX. Trial version can be retrieved there
The step by step procedure is the following:
1/ Download vmdk images. One is for vQFX Routing Engine and the other one for vQFX PFE.
2/ Upload vQFX RE and PFE vmdk into your datastore
3/ Convert vmdk images before using them. Open your ESXi terminal - go to your volume and folder which hosts the previous uploaded images:
vmkfstools -i vqfx10k-re-15.1X53-D60.vmdk vqfx10kRE.vmdk -d thin -a buslogic
vmkfstools -i vqfx10k-pfe-20160609-2.vmdk vqfx10kPFE.vmdk -d thin -a buslogic
4/ Then create the 2 VM.
Create RE VM:
- 1 vCPU - 3 core / 5Go RAM
- Add vqfx10kRE.vmdk as master disk
- 1th NIC E1000 is for Out of Band Management
- 2nd NIC E1000 is for RE/PFE communication
- Extra Data plane interfaces ( E1000 NIC) are attached also to RE VM
Create PFE VM:
- 1 vCPU - 1 core / 2Go RAM
- Add vqfx10kPFE.vmdk as master disk
- 1th NIC E1000 is for Out of Band Management
- 2nd NIC E1000 is for RE/PFE communication
5/ Attached the 1th NIC of both VMs to your out of band virtual switch.
6/ Create a new virtual switch for inter-VM communication (RE <> PFE). Enable promiscuous mode and mtu = 9000. Then attached the 2nd NIC of both VMs to this newly virtual switch.
7/ Attached extra data plane NICs (of the VM RE) to other virtual switchs connected, for instance, to a physical NIC or another VM (such as another vQFX or a vMX).
8/ Run both VMs

9/ Use the ESXi console to access to the vQFX RE:
Default login to access to the RE VM is:
login : root
pwd : Juniper
Then type: cli
Add configuration for root & other users and em0 configuration for out of band management.
10/ Configure your data plane interfaces. Starting from xe-0/0/0 up to xe-0/0/11.
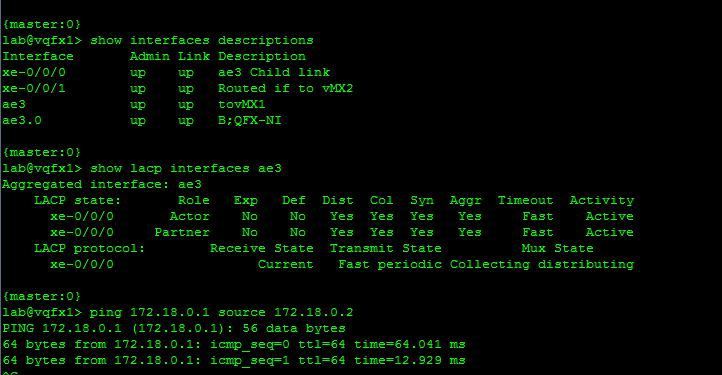
11/ Then, Enjoy switching ;)
David.


